Sunday, May 21, 2017

Spring Display Case

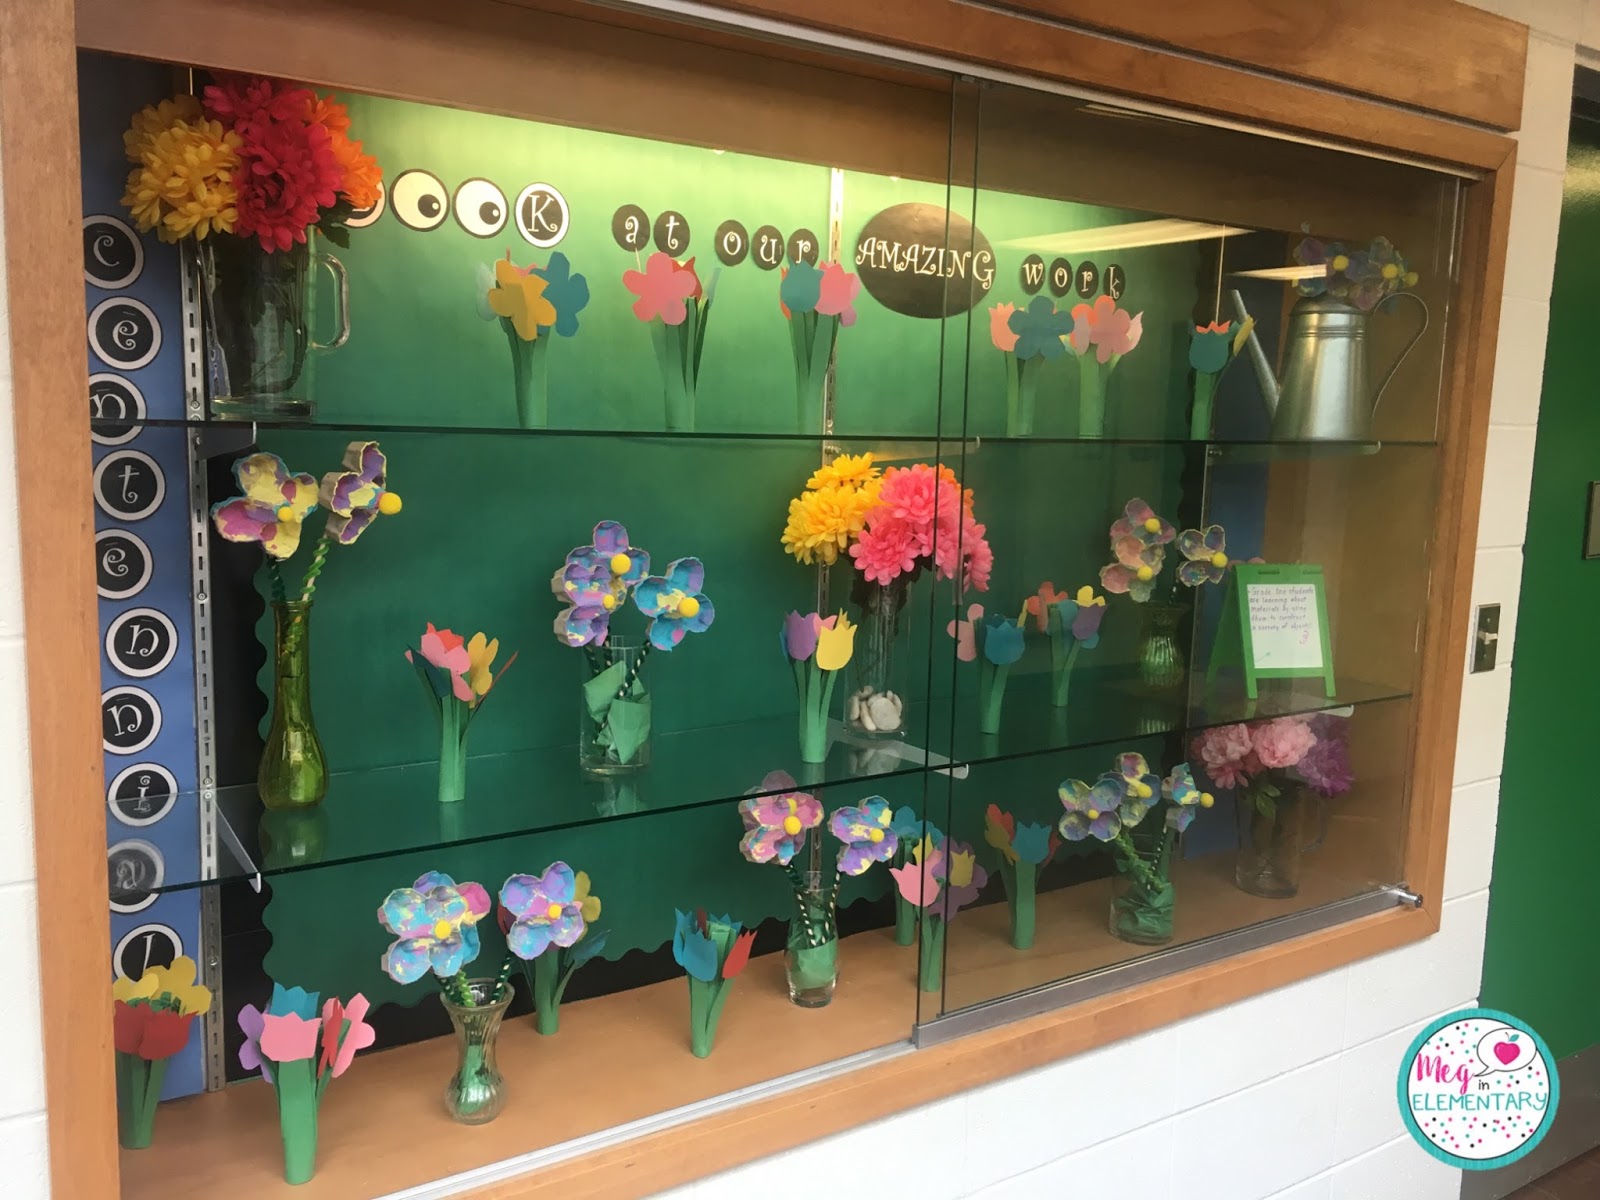
Near the entrance of our school, we have a display case where student work is featured. Teachers can sign up for a month to put their student work out on display. Since bulletin boards and student work displays are kiiiiind of my favourite thing - I signed up for the month of April! 

Since I teach the whole school, I had a lot of choices of classes to do a project with. I decided to go with my grade one kiddos as we were currently in the middle of their "Building Things" Science unit. We had done lots of different building tasks using materials parents had donated and still had lots of materials left to use.

We ended up making these cute little flowers that I came across on Pinterest. We happened to have a ton of egg cartons left over so obviously this project was meant to be!
To prep for this activity, I had pre-cut the flower shapes out for the kids. It was quite difficult and I wasn't sure if their little scissors would do the trick. We then painted them using tempura paint. We lightened all of the colours to create a more pastel palette for Spring. Each table had one colour of paint and we rotated through each of the stations to get all of the colours. We had to be pretty careful to make sure our paints didn't mix and create a brown colour instead. We waited a couple of minutes in between each colour to do our best to avoid this and the kids did such an amazing job! #proud

Once they were dry, we hot glued on a yellow pom pom in the center and created a simple stem. We needed something sturdy enough to hold the egg carton flowers upright, so we used a thick wooden stick, wrapped it with some green pipe cleaner and we were good to go!

As a little extra, we made paper flower bouquets. You can find the instructions here!

Before putting in our work, I decided to decorate the case as well. I added some paper (our school colours are blue and green), a border, created some letters using PowerPoint and it was ready for our work!
The kids were really excited and proud to see their work out on display.

Happy Spring!

Wednesday, May 17, 2017

Throwback #1 - Resolutions

Okay - I think I now understand the blogging/teaching/prepping/marking/life balance struggle. I guess I'll just have to backtrack and do a few throwbacks to some of the things that have been going on in Room 6!

First, I'll start by going back to January. Agh, January! Oops, that's waaaaay gone (it feels like this was only a few months ago - it's crazy to think it's already mid-May!!)

All of my division 2 students (grades 4-6) were a part of this New Year's Resolution board! The theme for this lesson was "start the new year on the right foot". Each student received a shoe template and were asked to make a New Year's Resolution.
Here was the completed board! I created some hills, roads and printed off some little signs and glued them to wooden sticks to pull it all together!
Before doing this, we reviewed S.M.A.R.T goals (Specific, Measurable, Attainable, Relevant and Timely) and why people make New Year's Resolutions. We discussed how people achieve their goals as well as reasons that many are unable or give up. We do goal setting as a school, focusing on academic goals, so I asked them to work on a more personal goal - something that was completely unrelated to school. After brainstorming a few ideas, the kids were on their way!
They had some really thoughtful (and interesting) goals! Turns out a lot of my students are nail biters (ha ha).
This shoe template was found on google. I asked the kids to come up with a symbol or logo that represented their resolution to go inside the circle.
 By the time I did this activity with all of the grade 4-6 students, our shoe trail was quite long.
I made a resolution with the students to get more rest. 5 months in and I'm still tired 😂
#endoftheyearteachertired

Tuesday, December 13, 2016

This Week in Room 6: Plasticine Art

Earlier in the year, our students completed a literacy adventure during Read In week organized by our school's wonderful librarian. The kids rotated through a variety of stations, one of them being  plasticine art inspired by author and illustrator Barbara Reid. This was something that had been done in previous years and was a huge hit with the students. The plasticine station (Artist's Island) ended up being in my classroom and I was definitely on crowd control trying to count 30 little people to let in (there were just so many kiddos and not enough room!!). The kids were so eager to create a plasticine art piece that I decided to take this activity and have my Kindergarten students complete it as their holiday gift to their families! Not only is the plasticine lots of fun to play with, it is also an excellent way to help develop and build muscle strength in those tiny little hands! Win win!
We used cavases from the dollar store but a strong piece of cardboard would work as well. I got a few different Christmas cutters from Michaels to help the kids with creating some shapes and to give them a basis to work from. The plasticine was precut and each group received a little bit of each colour!

Before beginning, I shared with the students different strategies to spread their plasticine. We discussed how our pictures were going to be layered and we first needed to create a background. We also talked about how a little bit goes a long way and I demonstrated this for them to see how I spread the plasticine. We then got to work!

Some students decided to do a number of colours where others chose to do one or two.
Here were the final products! Some kids used a lot of colour and detail where as some did a more simple piece. I love how they all turned out!
We've wrapped them up using tissue paper and put them into some beautifully decorated gift bags, along with some cute cards we made earlier in the month! The kids are looking forward to bringing them home this week and giving them to their families.

Merry Christmas!

Wednesday, December 7, 2016

This Week in Room 6: Gingerbread Friends

Happy December!

Today I'm sharing an idea that I recently did with my grade 3 health students! We've been spending some time discussing qualities that we appreciate in friends (this is something I do at the beginning of the year when we do our "getting to know you" activities, but it is something I like to constantly revisit as a reminder).

With Christmas right around the corner, we created "Gingerbread Friends". As a class, we brainstormed a number of qualities we would like to have in a friend and that we feel are important for us to demonstrate as well. We worded it to finish the phrase, "Being a good friend means:".

Some of our ideas included:
  • caring for others
  • telling the truth
  • including everyone
  • treating others how you want to be treated
We tried to word our ideas positively; when students would say "not saying mean things", I would ask them to reword it so that we were saying the things a good friend WOULD do, rather than what they SHOULDN'T do.

After students had their idea, they received a gingerbread man template on brown construction paper where they wrote down what being a good friend meant to them. They then decorated them and I cut them out to display on the bulletin board outside of my classroom!
Now, where do you put 21 Gingerbread Friends?! On a giant gingerbread house, of course! Thanks to pinterest, I was able to get a few different ideas and here was the final product! (This took much longer than I would like to admit) :)
Here is the completed board!
Happy holidays from the Gingerbread Friends in room 6!

Wednesday, October 19, 2016

This Week in Room 6: Secondary Colour Monsters

My grade one students are completing their unit on creating colour! We did a cute Halloween themed project where we mixed our own paint colours and painted some silly monsters.
To prepare for this project, I drew two different monster shapes, traced them and cut them out for the students. I did an easy and basic shape for ease of cutting out AND also because I'm not great at drawing. I also had the decorations cut out in advance (a variety of different coloured pipe cleaners, colourful yarn for hair and a mix of different mouths they would later glue on).
When it came time to paint, students had to identify which colour monster they wanted to create as well as what colours they would need to mix together. If they were correctly able to tell me what they needed, I put a little check mark on the back of their monster next to their name (yay for super quick assessments). We then added white to the mixed colour to change the shade.
Once they had dried, the kids were able to decorate them (pipe cleaner arms, yarn hair, coloured paper mouths and their choice of 1, 2 or 3 googly eyes).
Here is the completed bulletin board! (Thanks to pinterest for the background ideas).
Here is the completed bulletin boar
I love how they all turned out and that no two are the same. CUUUUUUTE. Happy (early) Halloween :)

Thursday, September 22, 2016

This Week in Room 6: Mixing Colours

This week, my grade one students have been learning about the primary and secondary colours. We completed this painting project today where they mixed the colours using their hands - messy, but fun!
I first had them tell me what colour they wanted to create and then tell me what two colours we would need to paint their hands in order to make that colour. Once they had both of their primary colour prints, they rubbed their hands together to create their secondary colour!
Because the idea of having 21 grade one kids painting their hands all at the same time terrified me, I had the kids working on other activities while I took small groups to do their pictures. I learned last year that when painting, small groups > large groups ha ha.

The kids absolutely loved the messiness and getting to see the colour change on their hands. A very HANDS ON approach to teaching this concept :)


Tuesday, September 13, 2016

This Week in Room 6: "Where's Waldo?" Inspired Bulletin Board

So, a fun little perk of teaching the whole school is having the opportunity to do fun back to school boards like this!
This week, my students have been working on creating a drawing of themselves to create our own version of "Where's Waldo?" on the bulletin board outside my classroom. I created one of myself and the students will then have to try to find me. I figured the kids would easily be able to pick me out of the crowd with my sparkly shoes (I like sparkly everything, really) and a Mickey pen (since the kids know I love Disney). Every day I will move my character around for the kids to find!
Can you see me?
I did consider giving the students a template but then decided I wanted to see their unique drawings and versions of themselves. I'm super happy with how it turned out!
Pinterest win!

Thursday, September 8, 2016

In the Classroom: Organizing Student Materials

Keeping track of 15 different classes of students is no easy task - maybe impossible if you're not organized. This year, I've decided to use this amazing bin organizer from IKEA to organize all my students' notebooks and materials. I created these cute chevron labels, laminated them and placed them on each bin according to the grade and subject area. The kids know exactly where to find their work and where to place it at the end of class. I love these bins because they're so sturdy and can be easily slid out of the organizer to take home for marking if needed!


*Download these cute labels on my FREEBIES page!*

If something happens to get misplaced, it ends up here:

The students know that if they didn't receive their book or work back, they will likely find it in the "No Name Bin". This bin is usually empty (thankfully)! 

How do you keep your students' books organized?

Saturday, September 3, 2016

These NAILS

This Disney teacher is ready for a new school year!


Thanks to Helen for these incredible HAND PAINTED Disney inspired designs. I love them and so do my students!

Post one

Yay, post number one! After nearly a year of debating whether starting a blog was something I wanted to do, I figured I needed to stop thinking about it and try it. So, here we are!

My posts will usually fall within one of the following topics:

{Tech Talk}
Technology is a large part of my classroom - here I'll share how I've implemented it and my favourite websites and apps for students (and some for you too)

{Book Chat}
Read about some of my favourite children's literature that I've shared with my students as well as some great resources for teachers

{In the Classroom}
These posts will include ideas, tips and tricks that I use in my classroom

{This Week in Room 6}
Here I'll share activities and lesson ideas that I've done over the week with my kiddos.

I will also share resources I have created  - these will be available to download through my FREEBIES page :)